 There are many different DAWs out there and, apart from some exceptions, they sound basically the same. What differentiate a DAW from another most of the times are things like features and ease of use.
Even though you can master your own project with almost any DAW, from Pro Tools to Logic, there are some serious advantages of using a piece of software that is completely mastering-oriented. You’ll usually get a cleaner and uncluttered environment, visual metering graphs and features that have been created with the the mastering job in mind, like DDP image creation for instance.
These things will make your life easier and your works will take shape faster.
In this world filled with dozens of different programs, Presonus Studio One 2 has become more and more popular over the last few years due to its versatility and competitive price tag. A thing that many people are not aware of is that Studio One 2 offers a complete mastering environment which can easily rival with more expensive DAWs.
Today I would like to give the spotlight to this “Killer Feature” of Studio One 2, a component that, to me, can justify the price of the software by itself.
The Power Of The “Project”
You’ll basically get 2 different working environments in Studio One 2: the “Song” and the “Project”. Even if the name may sound a bit misleading, while the “Song” environment is there for production and mixing purposes, the “Project” environment is all about mastering.
Note: I need to clarify that this feature is only available in Studio One 2 Pro so, if you own an Artist or Producer version, you’ll need to upgrade to Pro to get the mastering features.
At the time of writing, Presonus is offering a 25% off on upgrade from Artist or Producer.
The Project has been designed in a very user friendly way; everything is pretty straightforward and it won’t take you too long to fully understand all the bells and whistles.
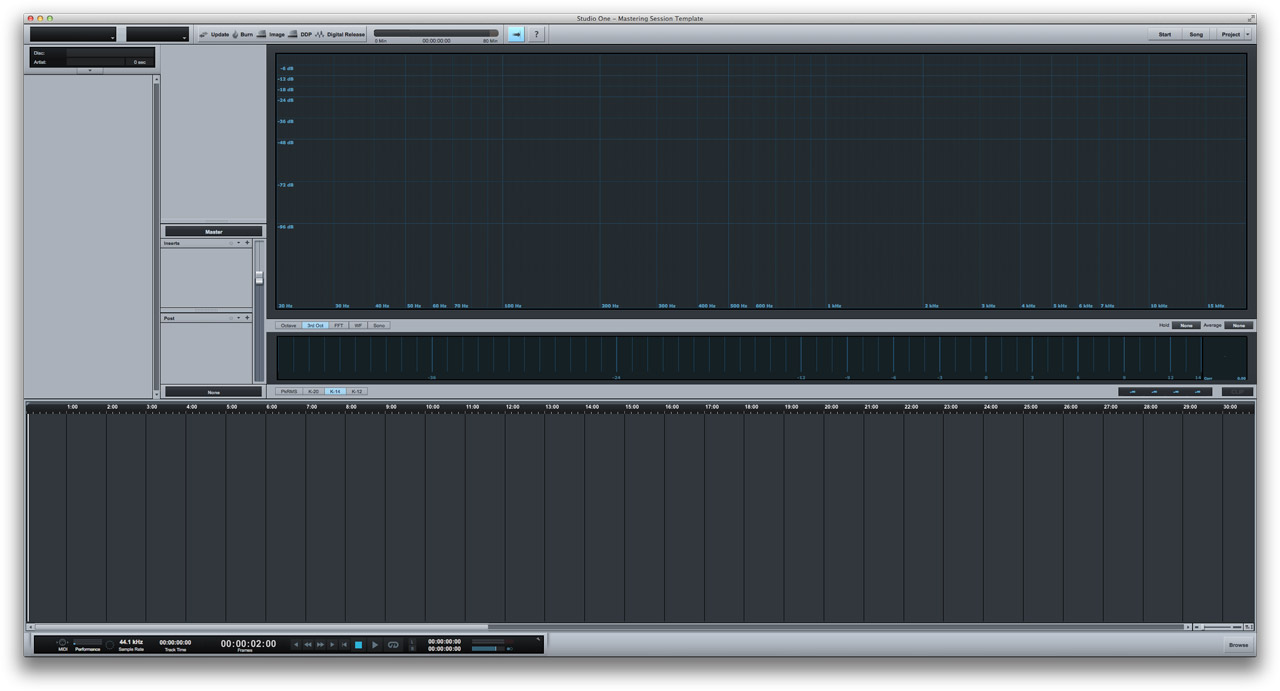
This is what you’re going to see on your screen right after clicking on New Project from the File menu (click on the image to zoom).
Working With Tracks And Plugins
On the left, you can see all the songs of your session arranged within the column. If you just created a new project, this will be blank, but you can easily import a new track by clicking on Project > Import.
After that, all of your songs will be displayed as a sort of playlist. You can change the color of your track by clicking on the slim blue column on the left and, with some simple drag-and-drop, arrange and move around all the songs at your wish. By clicking on one of them, that track will be highlighted and you’ll see all the processing you applied to it in the right column, just above what’s called “Master” section.
As the name suggests, the master section holds all the tools that you want to apply to each of your tracks (say a dither or a specific loudness meter, for instance…).
To recap: the chain is something like this: Track >> Individual Inserts >> Master Inserts.
Not so different than a standard Pro Tools, Cubase, <put your DAW here> session, isn’t it?
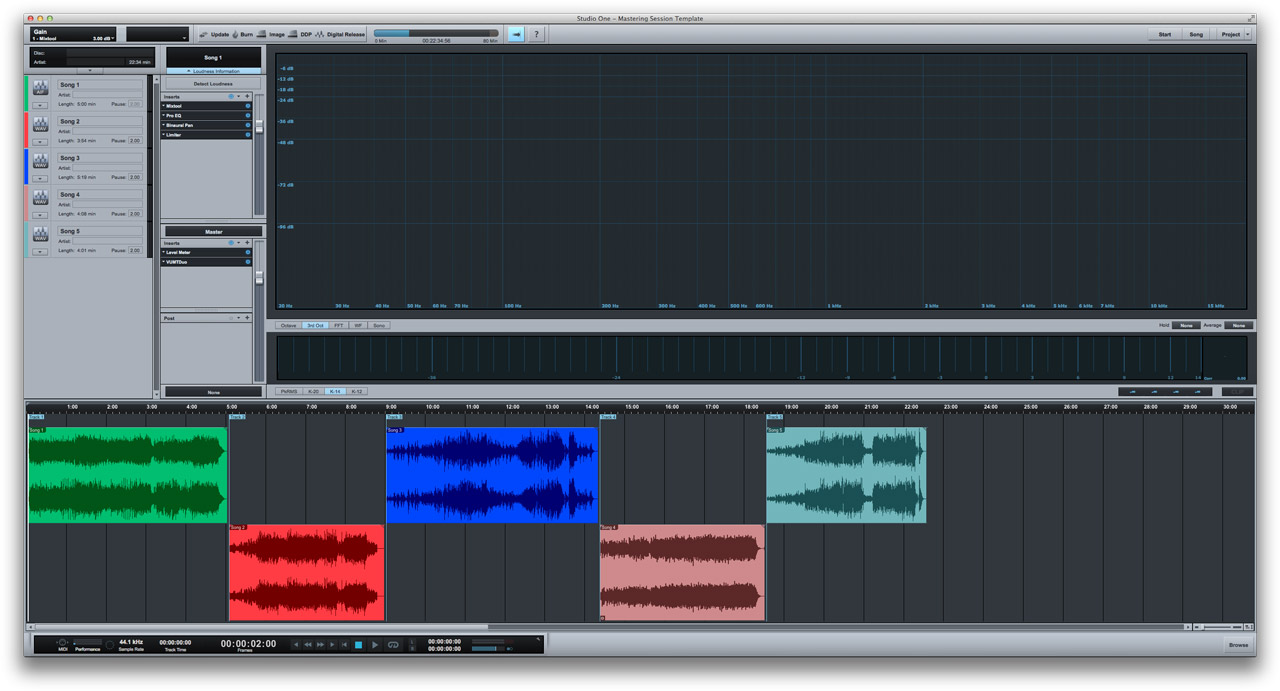
Just above the inserts column, there is a “Loudness Information” tag. By clicking it, a “Detect Loudness” button will appear. With one of your songs selected, click that button to get an instant loudness indication for that track. This will give you things like peak/RMS levels and DR value.
From my personal experience, the result you get here is basically the same you get using the good n’ old TT Dynamic Range Meter.
On the bottom of your screen you’ll find the Transport bar, with things like playback buttons, locators, time indicators, project informations and so on…
A little exception is the “Browse” button on the right. By clicking on it you’ll have instant access to all of your plugins (categorized in different ways) and files as well. It will let you do things like select and swap effects or import files in no time, and you can hide the window by clicking on the button again to keep the screen clean.
Last but not least, just above the Transport there is the Timeline. All the audio files you are working on within your current session will be arranged there as a sequence of tracks, with a bit o spacing between each track. You’ll be able to spot the total run time of your project by looking at the top of the Timeline.
Visual Metering And More
Now it’s time to spend some time talking about the various metering options that come with Studio One. Looking at the screen, all the space from about the center to the far right is dedicated to metering stuff.
First on top, the Spectrum Analyzer: you can customize the way it will “see” your sound by clicking the buttons in the left corner (Octave, 3rd Octave, FFT…) and you can change the Hold and Average times as well, by choosing them from the 2 drop-down menus in the right corner. If you hover the mouse pointer over the analyzer, it will give you the frequency you’re hovering on and its level in dBs.
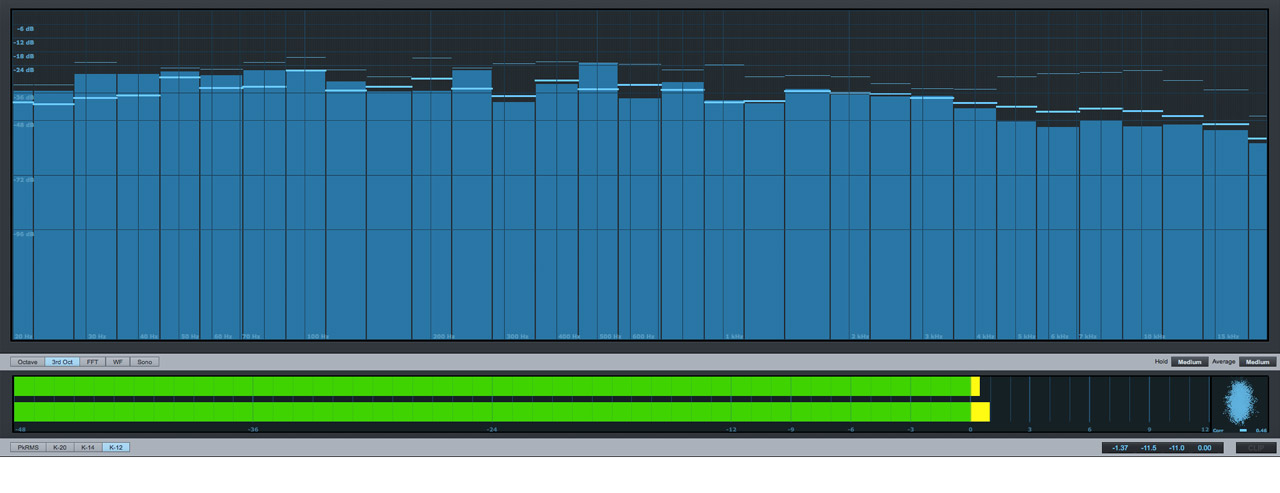
Just below we have the Loudness and Phase metering tools.
The Loudness Meter can be customized from the simple Peak-RMS configuration to the advanced K-Metering systems.
With the Peak-RMS button selected, it will give you a visual feedback of both the peaks (the tops of the 2 bars) and the RMS value, indicated by 2 white lines hovering within the level bars. That’s just a common level meter with an average level indicator, but it works great!

Conversely, using one of the 3 K-Metering systems you’ll get a very good approximation of the real perceived loudness. The K-System has been developed by the mastering engineer Bob Katz. It uses complex algorithms that can determine how loud the human hear will perceive a specific program (the audio you’re playing) in a manner that is frequency dependent.
If you’re working with pop, rock or commercial music, the K-12 or K-14 will do the job. The K-20 is more indicated for classical stuff, speeches and things with wide dynamic range. When using the K-Metering, make sure you’re NOT going beyond the yellow strip! If the meter turns red, this is an alert that your track is too loud. Back off the volume a little bit and enjoy dynamics. A handy numeric level indicator with a “CLIP” light is available at the bottom of the Loudness meter.
The small square box on the right of the Loudness Meter is the Phase Correlator. It will give you some clues about possible phase issues. If the indicator bounces on the right for the most part of the song, your track should be in good shape.
Be aware of the fact that all these metering tools are virtually placed after the mastering insert!
If you’re using some kind of corrective eq or whatever within the mastering inserts, make sure to turn it off when looking at the analyzer, otherwise you’ll most likely get a fake representation of your sound.
Here it is Part 2…

![From Mixing To Mastering – How To [Reader’s Question]](http://www.recording64.com/wp-content/uploads/2014/10/mixing_desk500-150x150.jpg)