
 In Part 1 we started covering all the basic features that make Studio One 2 a real mastering DAW.
We discovered how powerful the “Project” really is and got a bit deeper with the interface and the metering tools.
In this last part, we’ll deal with things like plugins, sound quality, export options and mixing-mastering workflows integration.
Ok, It’s Great! But What About Some Mastering Tools?
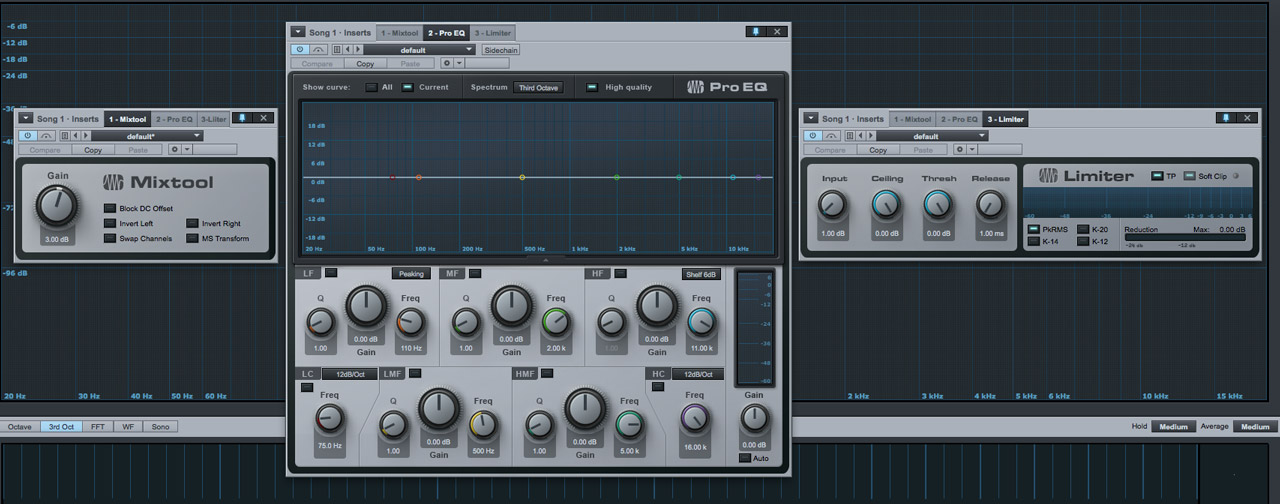
A mastering DAW wouldn’t be such without some bundled plugins to work with, right? From simple gain tools to specialized multiband processors, they all come free with your copy of Studio One! And I can tell you: they work and sound great. Writing about every single plugins that comes with the DAW would have required too much space, so here’s my personal top 3.
#1 The MixTool
It’s a very simple gain trimming tool. I use it every time right on top of my mastering chain to give my track the level I want. It includes some other useful features, like L/R channel inversion.
#2 The Limiter
One of the best bundled limiters I’ve seen so far, for sure. It has all the things you’d expect from a good limiter (Input, Ceiling, Release, Gain Reduction Meter…) and some cool stuff that comes super helpful during mastering, like True Peak Limiting and Soft Clipping! You can even choose between all the different metering systems, from Peak-RMS to all the K-Meterings.
#3 The ProEQ
This 7-band EQ can be adjusted in really small steps for both level and frequency, for super resolution and accuracy. It features a built-in spectrum analyzer as well.
The only real downside of this EQ is that it’s not linear phase! I’m really missing this thing. It would have made it the “perfect” EQ.
Double 32-bit Processing: A Real Work Horse
 “It offers too much! There must be some kind of swindle somewhere…It will probably sound like crap!”. Have you though something like that while reading? I’m asking because I did, at first glance… Never been so happy to be completely wrong actually! There is no scam! It just sounds amazing, as good as many other popular DAWs, if not better.
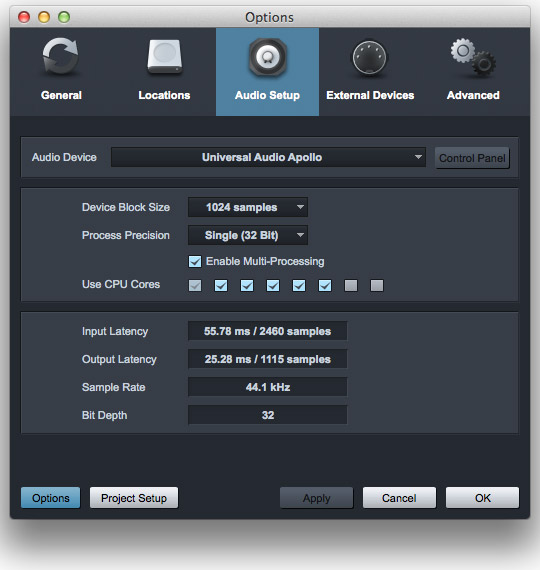
I’m saying “if not better” ‘cause the DAW can work with a double 32-bit processing within the session. While most of current DAWs are processing audio at 32bit, Studio One offers double precision processing (64bit). Yes, it will really stress your old CPU, but if you computer is relatively new or if you’re mastering something with just a few plugins, you should really try it and hear how it works and sound with analog-based stuff.
Note: don’t forget to raise the latency buffer to 1024 or 2048 and enable the multi-core processing to drain all the power your machine can offer.
Metadata, Burn, Image, DDP, Digital Release?
The guys at Presonus really wanted to give us a very cool piece of software: they included some really awesome features for exporting your works as well as stuff to tag your songs with all the informations and codes needed for any commercial release. Those features have been exclusives to mastering DAWs only! Wether you’re going to put your track on iTunes or send your latest EP out for physical duplication, Studio One has all the things you need to get your work done.
 Start by clicking on the first song you want to edit, selecting it from the column on the left.
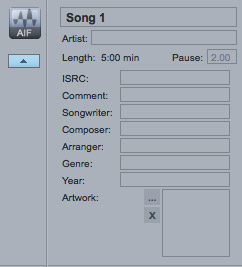
From there you can fill in the basic information like title and artist and change the gap duration, the length of the pause between each track.
By clicking on the little arrow on the left, you’ll get access to all the other metadatas like ISRC code, genre, artwork…
You can do the same with the stuff related to the entire album: look above the first track in your playlist… Now, fill in the album title and artist and click the pointing down arrow to see more. It’s very simple and just where you want it. You can edit it at any time and always have your track’s information in front of you.
When you’re done with tagging and things like that, it’s time to export. It couldn’t be much easier.
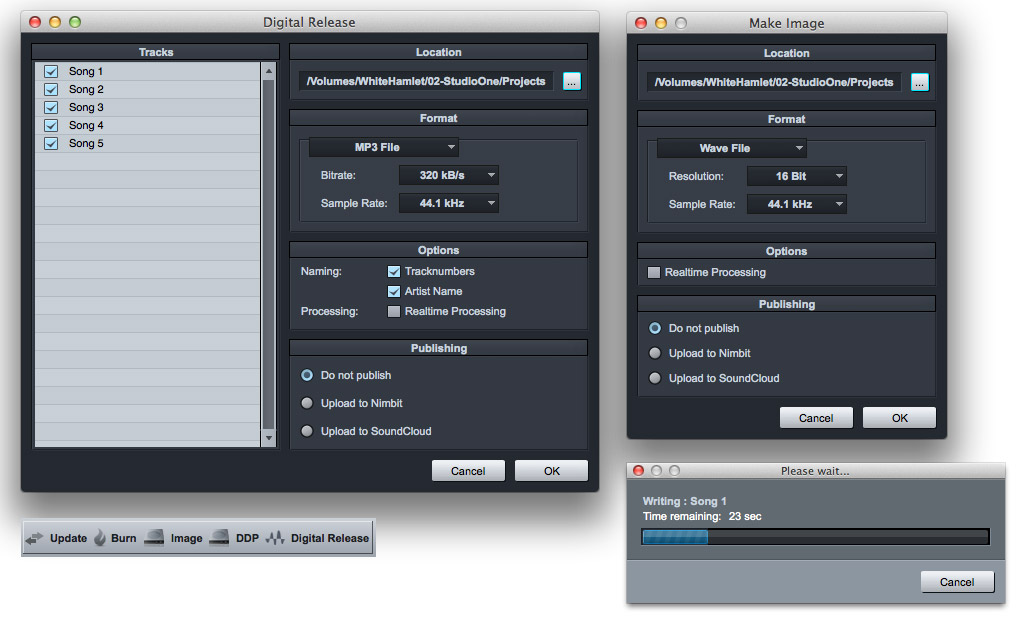
Just select the export option from the Project menu or click on the relative icon just above the inserts column.
If you want to create an mp3 file, for instance, just click on Digital Release, set all the parameters to your wish and go. Do you want to create a master image file to send out for duplication, or a standard audio cd for your archive? Simply choose the Image,DDP or Burn icon and voilà.
Be aware that Studio One will create a new directory with the exported stuff, with everything all categorized and methodically organized, ready to leave your computer!
Seamless Integration Between Song And Project
If you’re using Studio One for both production, mixing and mastering purposes, then you’ll really enjoy knowing this!
Pretend you just completed a new mix, you’re ready to master, you open up a new Project and after some tweaking you discover the snare is way too bright… Dealing with things like this in mastering is possible, but the risk to harm the entire track is high. So, what to do?
If you’re using another DAW for mixing, you need to close Studio One, open up the mixing DAW, fire up the mixing session, make the edits, export, close, reimport in Studio One. This means one single thing: wasted time! (believe me, I am a Pro Tools guy and I know what this means, sadly…).
But… If you used Studio One since the beginning, you will have a Song file tha’s basically your session. The cool thing is that you can create a new Project (for mastering), load the Song file and work on that. You won’t have to open the Song and export the mix.
Studio One will bounce the track and import it within your Project and if you’ll need to make some changes to the original mix, you can get back to the Song file and make the edits. Then, after reopening the Project environment, you’ll just need to click the Update icon to get back to work on the master. Again, Studio One will check if your mastering files are up to date. If changes are detected, the DAW will bounce your track again (using the edited session) and replace the old mastering file with the new.
You’ve been able to make changes to just the snare that was sounding too bright and can get back to mastering in about 2 minutes, without all the fuss of closing and reopening stuff and things like that! That’s the icing on the cake, super cool.
Allrighty then, that’s all for today!
What do you think of it? Are you already using Studio One or are you going to try it out?
Feel free to comment with your thoughts, suggestions or whatever.


![From Mixing To Mastering – How To [Reader’s Question]](http://www.recording64.com/wp-content/uploads/2014/10/mixing_desk500-150x150.jpg)

I’ve been browsing online more than 3 hours
today, yet I never found any interesting article like yours.
It’s pretty worth enough for me. Personally, if all site owners
and bloggers made good content as you did,
the internet will be much more useful than ever before.
Thank you so much for your time and for the kind words. Glad you liked the contents.